Washed Out Synths

Dial in a lush, fluid lead in u-he Hive, perfect for deep, emotive drum & bass or downtempo tracks.
In today’s Synth Secrets, we’ll dial in a simple and effective washed out lead inspired by atmospheric drum and bass producers like Etherwood that would be equally at home in d&b or a dreamy house or chillout tune. We’ll use u-he’s Hive, one of our perennial favorites, due to its simple layout, gorgeous sonics, and capable effects processing section. You can grab a demo of Hive here, or follow along using your favorite softsynth and effects plugins.
Let’s get started. Set your workstation’s tempo to 174 BPM, punch the MIDI below into your instrument track, and let’s dial in this patch:
 Basic setup
Let’s start fresh by initializing the patch – right click on the preset browser and select “init.” We’re going to base this sound on the simple and versatile sawtooth wave, which is the default waveform in Hive, so leave oscillator 1 as it is.
What we do want to change is the volume envelope of the patch. After we strike a note, we want a sound that falls away gradually no matter what we do rather than one that plays full-blast while the key is struck and then ends abruptly when it’s released. Adjust the AMP1 envelope to match the parameters below.
 Filter to Taste
This is an ambient lead – too much high-frequency content doesn’t suit the vibe. Filter 1 is set up as a low pass filter by default, which is perfect. Roll the cutoff frequency down to about 2 o’clock (or a value of about 100) and push the Mod Env know up a touch, to a value of about 25. This will cause the filter to open up a touch, following the contour of the modulation envelope, when a note is hit.
Then adjust the MOD1 parameters to match the image, which will give the envelope the languid character we want.
 Hearing Double
What we’re getting out of filter 1 is a good start but a little too crisp and immediate. We’ll counteract that by routing a clone of filter 1’s signal through filter 2, which we’ll change to bandpass mode, rolling off both high and low frequencies and giving us a warm, mid-focused tone, almost like the resonating body on a cello or a guitar.
On the filter 2 input selector, click on FILT1 so it lights up, indicating that we’re sending a copy of filter 1’s audio through filter 2 and then ultimately to the output. Adjust the cutoff and resonance knobs both to about 10 o’clock. Also, adjust the AMP2 sliders to match the image below – the extended release time gives us that resonance we want. Finally, turn the Volume knob in on filter 2 up to max.
 Washing out
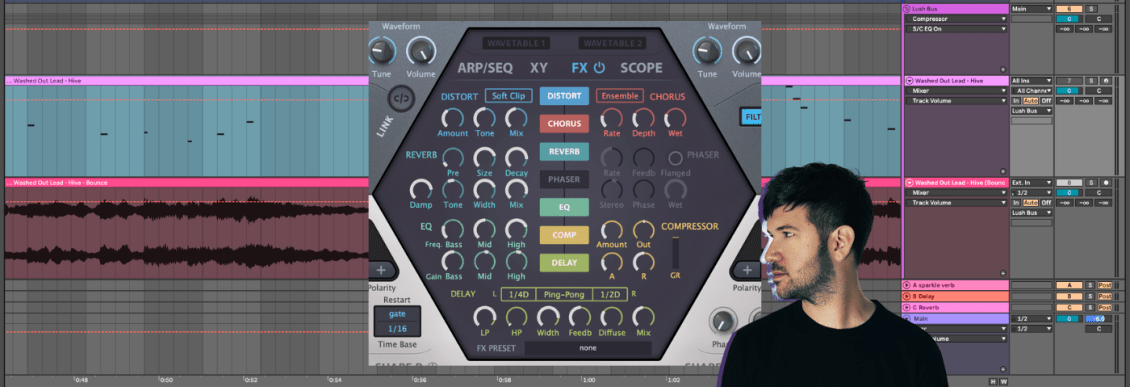
We’re going to skip ahead a bit and throw a reverb on the patch. Navigate to the FX section in the middle of the interface, turn the reverb on by clicking on the REVERB button, and adjust the parameters to match.
You’ll instantly hear that this is a pretty dramatic effect – we’re laying it on thick. Thick reverb is an integral part of this kind of sound and it has a way of smearing whatever changes come earlier in the signal chain, so it’s better to turn the reverb on now and make sure that the more subtle changes we want to make are actually even audible through the thick curtain of verb we’re laying on.
 Adding distortion
We want some more harmonic density. Though the word “distortion” likely doesn’t come to mind when you hear the word “atmospheric,” a bit of the stuff preceding a thick reverb effect does wonders with thickening out the sound. Activate Hive’s distortion engine and adjust parameters to match.
 Spin Cycle
To really wash this patch out and add width and depth we add some chorus and delay. Turn those effects on in Hive by clicking on their corresponding buttons, then adjust the parameters to match. The chorus comes right after distortion in the signal change and adds a little gloss and shimmer. When it comes to delay, we’re trying to make this sound expansive, so we’ll select some very long delay times – a dotted quarter note for the left channel and a dotted half note for the right channel. Note that the order of those delay values matters!
Since the dry signal is routed to the left delay channel first, and then the left channel is fed into the right channel, you want to make sure that the shorter time value is assigned to the left channel. Otherwise, you don’t get the wide, dramatic ping-pong effect you’re looking for. Set the parameters on your delay and chorus to match ours.
 Compression and EQ
We want to make sure our lead doesn’t get lost in the mix, and we don’t want an excess of low frequency information competing with the bass and reducing the track’s impact. We’ll use a fairly aggressive compression setting with the default attack and delay parameters to give our dynamics a broad squeeze, really leveling out the volume peaks and valleys of our signal, then we’ll add some EQ including a sizable cut to the low frequencies to make sure the mix stays clean and punchy.
 Wow and Flutter
Finally, to give a truly dreamlike quality to our patch, we’ll use an LFO to gently modulate the pitch of oscillator 1, giving us some pitch drift over time. We’ll set the Time Base value of LFO1 to 2/1, or two full measures per cycle, and set the trigger mode to Sync. Then use the mod matrix to route LFO1 to modulate Osc1: Detunr. Set the depth knob on this assignment to a modest value, no more than 10 to 20. Any more than that and the pitch modulation goes from “hazy” to “nauseating.”
 Final Product
To finish this patch off, we’ll run it to a bus in our DAW that’s being squeezed by a compressor that’s using the kick drum as a sidechain signal. We’ll run some other atmospheric elements through this bus too, a common practice in all varieties of electronic music that allows the producer to go over the top with lush, verbed out elements without reducing the punch of the percussion and other more in-your-face elements of the mix.
With a touch of Ableton’s OTT and a sidechain squeeze, we land where we want to be – in washed-out euphoria.
[social-links heading=”Follow Attack Magazine” facebook=”https://www.facebook.com/attackmag” twitter=”https://twitter.com/attackmag1″ instagram=”https://www.instagram.com/attackmag/” youtube=”https://www.youtube.com/user/attackmag” soundcloud=”https://soundcloud.com/attackmag” tiktok=”https://www.tiktok.com/@attackmagazine”] [product-collection]Read More
Latest Shows
Latest news
Gallery
-


Comments
This post currently has no comments.