Shapeshifting Bass With U-he Zebra

Load up u-he Zebra, or something similar, and learn some synthesis fundamentals, including how to use an XY Pad, that can be applied across various electronic music genres.
In today’s synth secrets, we’ll use u-he’s powerhouse synth Zebra to create a bass patch inspired by the track 4 Ya Mind by AYYBO and Discip that can morph from a simple and solid plucked bass into multiple high-energy personalities fit for breakdowns and build ups. If you don’t already have Zebra on your machine, we highly recommend grabbing a free demo download here at u-he’s site to get a feel for this one-of-a-kind synthesizer. Here’s what we’re making:
This one is packed with detail. It’s a deep dive, but it will be worth it! We’ll use Zebra’s XY pads to modulate numerous parameters at a time, from filter settings to effects, allowing us to effectively build multiple patches in one, and giving us the power to easily morph from one to the next to suit the needs of our track.
Though this tutorial is specific to Zebra, there are other synths that come equipped with XY pads and allow for similar programming. Ableton Live itself slaps a programmable XY pad on any VST instrument track you create, so these concepts can really be applied to any virtual instrument if you get creative.
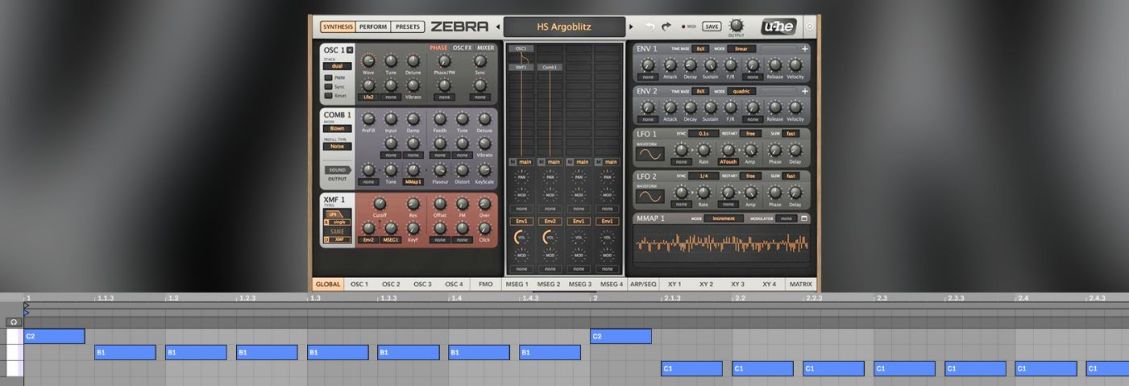
Fire up a new session at 128 BPM, create a new instrument track hosting Zebra, loop the simple MIDI sequence below, and you’ll be ready to dive in.
 Step 1 – Setting the Foundation
First things first, initialize the patch by selecting init from the preset browser. Then head down to the Mode selector in the global menu and switch from poly to legato, making sure that our bass patch will only fire off one voice at a time.

Now head to the OSC 1 module and make some initial moves. First, hit the Reset button on the oscillator which forces the oscillator to start from the same phase position every time a note is hit, which is key for bass patches if you want each note to hit exactly the same.
Then click on the OSC FX tab of the oscillator module, assign one of the knobs to the Sync Mojo effect, and turn the knob up to a value of about 32. This gives the oscillator a richer character than a raw saw wave, but maintains the hard-hitting simplicity we get from a single voice patch.
Finally, click on the MIXER tab of the oscillator module, turn the volume down to about 10, then assign the volume mod knob to Velocity and turn the value up to about 34. This allows us to control the patch volume via velocity values of each MIDI note.

 Step 2 – Shaping Tone
Now, move to the main grid. Currently all that lives there is an oscillator, labeled OSC1. In the three empty cells beneath that, we want to assign filters. Add VCF1, VCF2, and VCF3 to the next three cells.Then move over to the filter modules that just appeared and set the filters up as pictured.
Basically we have a low pass filter that will open a bit with each note hit, an EQ Peaking filter that boosts nasal frequencies and gives our bass a bit of an attitude, and a high pass filter that we can activate later via the XY pad. At this stage the most audible change is the resonant peak we introduced using VCF 2. Much of the payoff of this patch comes towards the end of the article when we start assigning parameters to the XY pads.
 Step 3 – Subtract
Now we’re going to pull VCF’s cutoff down to 0 and turn the modulation knob we set to Env2 up to a value of about 68.

Then we modify the parameters on the ENV 1 and ENV 2 modules to match what’s pictured. Make sure to switch the TIME BASE option to 1/1 – that gives us a snappier envelope than the default setting, especially when we pull the v-slope slider all the way to the left on envelope 1.

The volume will drop off a bit since we’re stripping so much high frequency content away, but we’ll take care of that in a moment.
Step 4 – Pump Up the Volume
Time to pump up the volume. We’re going to use a compressor for the task because that will also allow us to regulate volume levels when we start doing crazy moves with effects and filter sweeps. Add Comp1 and EQ1 to the bottom-left cells in the FX grid, which places them on the master output (Note: if you can’t see the FX grid, you need to click on the GLOBAL tab to pull it up).

Then match the parameters pictured.

You’ll notice that we’re turning the Comp control all the way up and the Attack and Release parameters almost all the way down, effectively turning the compressor into a brickwall limiter. We’re going to adjust the threshold such that when our synth is in its default state, hardly any compression even happens, but if we were to open up a filter or do other moves that increase the volume of the patch, our compressor will clamp down the output and keep things controlled and consistent. A subtle bit of EQ adds a bit of extra polish and edge to the sound.

Since our audio examples are normalized, you won’t hear the volume change here, but you definitely will in your own session. What you may hear are subtle tone differences that the compressor and EQ impart on our sound.
Step 5 – Add FM Edge
Now we’re moving into slightly advanced Zebra programming. We’re going to create an FM oscillator that is usually totally inaudible, but turns up to add an additional element to the sound when we move the XY pad to certain areas.
Add FMO1 to the main grid somewhere in the center lane. Then right-click on the FMO1 cell, which brings up the input selector. Choose Input 1, which routes our first voice, driven by oscillator 1, to the input of our FM oscillator. Still on the main grid, add VCF4 underneath FMO1 so we can have a low-pass filter strapped across the oscillator.

Then move over and change the parameters on the FMO 1 and VCF 4 modules to match what you see here. This gives us a biting FM edge. Since we assigned Env3 to the filter mod depth knob on VCF 4, a new envelope module appeared. Make sure to make its parameters match the image below.
 Step 6 – Payoff Begins
Now comes the fun part. We will start assigning parameters to the XY pads, allowing us to morph and animate our patch. First, turn the volume on the second channel of our mixer (the one with the FM oscillator) down to zero.

We will only turn that channel up when we need to, via the XY pad. Now click on the XY 1 tab heading on the bottom-right section of Zebra’s interface, opening up the mod matrix for the first XY pad. We’re going to route the X axis of the pad to the cutoff frequency of VCF1, and the Y axis to a handful of parameters, specifically the volume of the second channel of our mixer and the cutoff frequencies of our filters. Make your assignments match what you see here exactly!

The carrot on the top of each slider indicates the strength of modulation when the corresponding XY knob or pad is at the top of its range, and the carrot on the bottom indicates the strength when the XY is at the bottom of its range. Now, play around with the XY knobs and note how they change the character of the patch. Here’s what the sequence sounds like with some tweaking of those knobs in real time:
Step 7 – Express Wash
One combination of effects that works really well in a buildup right before a drop is a high pass filter and a reverb with a long decay. When you fade a reverb in and turn the cutoff frequency on a high pass filter up at the same time, you get an effect that washes out the signal in an exciting way. Even better, suddenly bypassing both effects on the downbeat of the drop gives you instant impact.
We have filter automation in place, so now let’s add reverb. In the effects grid, add an instance of NuRev further up the signal chain from the compressor and EQ we created earlier. We’re going to turn the Dry/Wet control down to 0 for now, making it so that the effect is bypassed unless a modulator like our XY pads acts on it. Make the other parameters match what you see here.

Then flip back to the XY 1 tab and add some of NuRev1’s parameters to the matrix. Get your settings looking just like what you see here, and then hit play and mess around with the XY knobs. You should hear no reverb at all when the Y knob is straight up, a subtle reverb when it’s all the way left, and a hazy, long reverb when it’s all the way right.
 Step 8 – Payoff Complete
To complement our reverb we’re going to add a chorus that only activates under certain conditions. In the FX grid, right click on the instance of ModFX1 that was there by default, and check the active option. Now, change the effect parameters to match what you see here.

Finally, go back to the XY1 tab and route the knobs to the ModFX1 parameters as pictured.
Now for the best part – performance. On the top-left corner of Zebra, select the PERFORM tab to pull up the XY pads. Now you can see what all your work gets you! Using the first XY pad, we can start in the center with a solid, standard house bass pluck.

If we move left of center on the X axis, filters start to move and we get a nasty growling bass, and if we move left of center, we get a subtle reverb effect that we can use if we like. If we move north on the Y axis, a lush reverb washes everything out, and if we move south of center we get a gritty FM edge running through a psychedelic chorus, and the predelay of our reverb changes to create a slapback echo in sync with our 128 BPM session.
Step 9
To put the icing on the cake we’ll add some post processing using our DAW’s built-in effects. Key to the sound is a compressor side chained to the kick drum.

Here’s our patch now on its own:
And once more in the context of a track:
Hopefully this deep dive into Zebra’s XY performance pads gave you some out-there ideas. Enjoy experimenting with this powerhouse synth!
[social-links heading=”Follow Attack Magazine” facebook=”https://www.facebook.com/attackmag” twitter=”https://twitter.com/attackmag1″ instagram=”https://www.instagram.com/attackmag/” youtube=”https://www.youtube.com/user/attackmag” soundcloud=”https://soundcloud.com/attackmag” tiktok=”https://www.tiktok.com/@attackmagazine”] [product-collection]
Latest Shows
Latest news
Gallery
-


Comments
This post currently has no comments.